Creating a Schedule
This article explains how to create a new schedule for the automatic assignment of audits in the AuditBLOOM system. Creating a schedule helps automate the audit planning process, increasing efficiency and ensuring regular inspections.
Step-by-Step Guide
One of the roles:
- Administrator
- Schedule Management
Type of workspace:
- Full workspace.
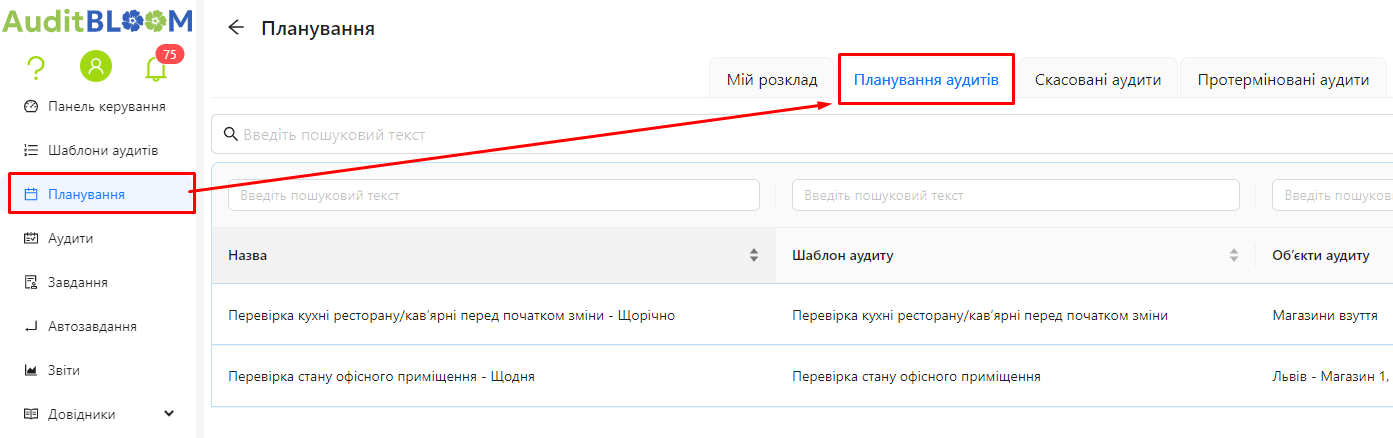
Step 1: Go to the "Audit Planning" Section
-
Log into the system with appropriate access rights.
-
In the main menu, select the "Planning" section and navigate to the "Audit Planning" tab.
Step 2: Start Creating a New Schedule
-
Click the button "Schedule Audit" to create a new schedule.
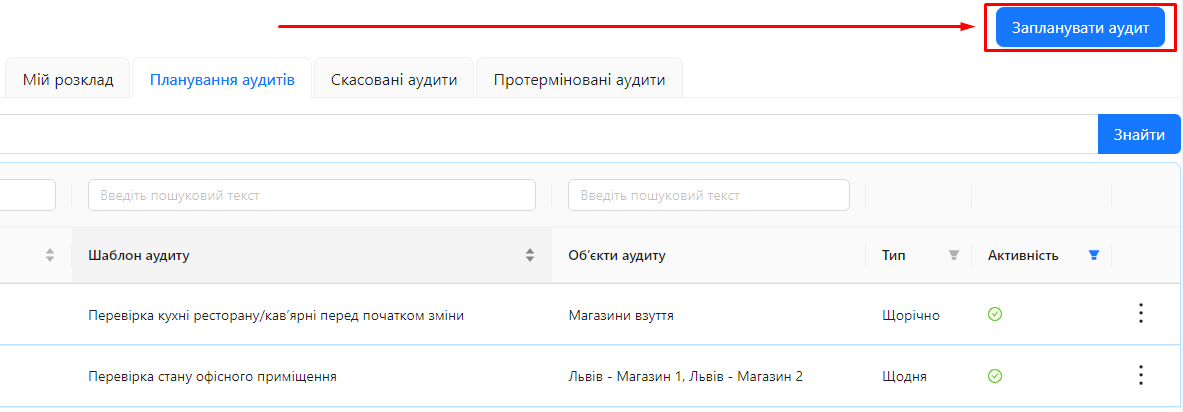
-
The system will open a form for setting up a new schedule.
Step 3: Fill in the Main Schedule Settings
-
Audit Template:
- Select an audit template from the list that will be used for the assigned audits.
-
Audit Objects:
- Choose the audit objects where audits will be conducted according to this schedule.
- You can select one or multiple objects from the list.
-
Assign Audit:
- Choose who will be assigned the audit:
- Users: Select specific users.
- User Groups: Select user groups.
- Choose who will be assigned the audit:
-
Schedule Recurrence Type:
- Select the schedule recurrence type from the dropdown list. Options include:
- Once
- Daily
- Working Days
- Weekly
- Monthly
- Quarterly
- Yearly
- Custom
-
Recurrence Settings:
- For each type of recurrence, specify the appropriate dates and times.
- Detailed settings for each type are discussed in the article Types of Planner Recurrence.
-
Validity Period:
- Specify the start and end dates for the schedule's validity.
- If the schedule should run indefinitely, leave the end date blank or set a distant date.
-
Allow Audit Completion After Deadline:
- Check the box if you want to allow users to complete audits after the set deadline.
-
Inactive:
- If you want to temporarily deactivate the schedule, check the "Inactive" box.
- By default, the schedule is active.
-
Schedule Name:
-
The schedule name will automatically consist of the template name and the recurrence type.
-
Change the schedule name if needed in the "Name" field.
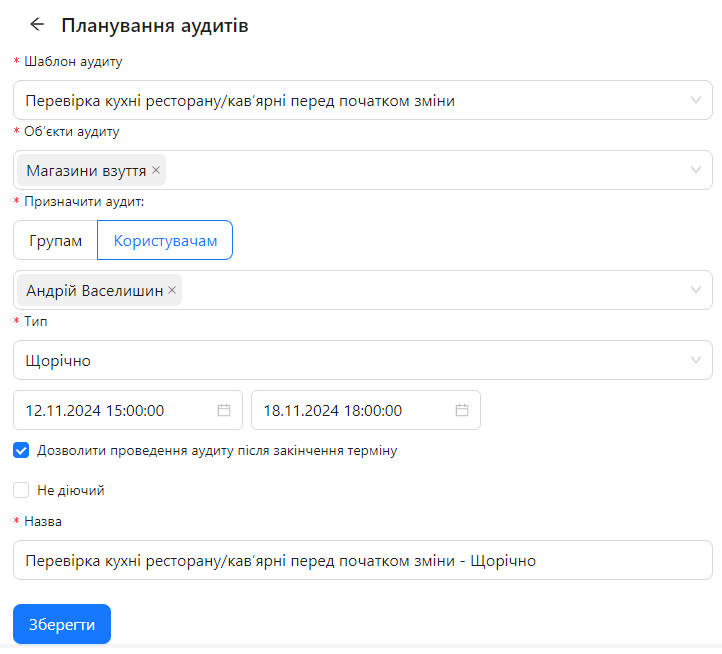
-
Step 4: Save the Schedule
-
Review the entered data:
- Ensure all settings are correctly filled out.
-
Click the button "Save" to save the schedule.
-
The system will save the schedule and return you to the schedules list.
When saving a schedule, the system automatically creates schedules for 8 days ahead for each audit object and sends notifications to the users selected as auditors.
Step 5: Verify the Created Schedule
- In the schedules list, find the newly created schedule.
- Ensure the schedule status is active and the settings are displayed correctly.
Notes and Tips
-
Schedule Name: Use informative and clear names for schedules to make future identification easier.
-
Assigning Audits to Groups: It is recommended to use user groups for assigning audits, simplifying management in large teams.
-
Settings Review: Before saving the schedule, make sure all settings meet your requirements.
-
Deactivating a Schedule: If a schedule is temporarily unnecessary, you can check the "Inactive" box instead of deleting it. All scheduled and uncompleted audits with start dates beyond the current date and time will be removed.
Frequently Asked Questions (FAQ)
Question: Can I edit a schedule after it has been created?
Answer: Yes, you can open the schedule for editing and make necessary changes. After saving, the user schedules for the next 8 days will be updated.
Question: What should I do if I made a mistake in the schedule settings?
Answer: You can edit the schedule or delete it and create a new one with the correct settings.
Question: Can I assign an audit to multiple users or groups simultaneously?
Answer: Yes, you can select multiple users or user groups when setting up the schedule.
Question: How can I deactivate a schedule without deleting it?
Answer: Check the "Inactive" box in the schedule settings. This will deactivate the schedule without deleting it.
Question: Can I change the recurrence type of a schedule after it has been created?
Answer: Yes, you can edit the schedule and change the recurrence type. However, note that after saving, the user schedules for the next 8 days will be updated.
Question: Will users automatically receive notifications about assigned audits?
Answer: Yes, after an audit is assigned, the system will automatically notify the assigned users according to the notification settings.